Thursday, August 29, 2013

Homemade Flour Tortillas

We go through a lot of tortillas at my house. I hated needing them for dinner, not having them on hand, going to the grocery store to get more and finding them not on sale. I figured there had to be an easy way to make tortillas at home. I found this recipe and tweaked it a little to work better for me. They are super tasty and easy to make!

What You Need
Makes 12-14 tortillas

3 cups Flour
1 cup Hot Water
1/4 cup Vegetable Oil
2 tsp Salt
2 tsp Garlic Powder


What To Do

Step 1: Combine all dry ingredients into your mixer. Add the oil, then slowly add the hot water. Mix until thoroughly combined.


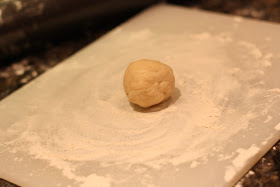
Step 2: Flour the surface you are going to be rolling your dough on. Make a 2 inch ball out of the dough. Gently flatted the ball with you hand. Roll the dough until it is 1/4 inch thick and 6-8 inches wide. Repeat until all of the dough has been used. *You can cook the tortillas as you go or place them on Saran Wrap, alternating between Saran Wrap and precooked tortillas. I generally will cook them as I go but end up rolling them out faster then they cook. So I end up having a backlog in Saran Wrap.


Step 3: Cook the tortillas on Medium heat until browned on both sides. Store in a tortilla warmer until you are ready to serve them. Enjoy! *Tortillas will be good in the fridge for about 5-7 days or go to Step 4 for a bonus recipe!


Step 4: Use your leftover tortillas to make tortilla chips. Preheat over to 350°. Cut tortillas into triangle pieces (about 8 per tortilla)Place on a baking sheet, making sure they do not touch. Salt if desired. Bake for about 10 minutes or until slightly browned. Enjoy! *They are also great as an alternative to pita chips! I enjoy mine with humus.


Saturday, August 17, 2013

Champagne Mojito

This is a fun twist on a classic cocktail!

What You Need
Makes 1 cocktail

1 1/2 cups Champagne
8-10 Mint Leaves
2 Sugar Cubes
Juice of 1/2 a Lime
5 Ice Cubes


What To Do

Step 1: Muddle mint.

Step 2: Add the juice of 1/2 a lime. Mix with muddled mint.

Step 3: Add 1 sugar cube, followed by the ice cubes, then the champagne. Stir. Add 1 sugar cube on top.

Step 4: Garnish with a slice of lime and a mint leaf.

Step 5: Enjoy!


Thursday, August 15, 2013

Nightstand Project #2

I got this nightstand for FREE from Craigslist! It took a lot of sanding to get the red off but it was well worth the price.


Nightstand Project #1

I got this nightstand off of Craigslist for $6. I tried to negotiate with the guy but he wouldn't budge. He was actually offended that I even tried. In the end it turned out great and was well worth the $6! All it needed was a little sanding, some paint and a door pull.

Wednesday, August 14, 2013

Homemade Crock-Pot Yogurt

I was looking into buying a yogurt maker when I came across this recipe  I never knew I could make yogurt in my crock-pot! My crock-pot has been sitting in the cupboard collecting dust for years and now I use it once a week.


Homemade yogurt is easy to make, has no added ingredients, tastes delicious and cuts the price of yogurt to at least half! This recipe yields about 2 quarts of regular yogurt or just over 1 quart of Greek yogurt. The only cost is for the half a gallon of milk (I use half of a gallon) and the initial 1/2 cup of yogurt for your starter. After you have made your first batch of homemade yogurt you can use that for your starter from there on out. So lets do the math:

$5.99 for 2 quart of Store Bought Plain All Natural Yogurt or 1 quart Greek Yogurt
$1.60 for 2 quarts of Homemade Yogurt or 1 quart Greek Yogurt (the cost of the milk)
$4.39 in Savings! That's 75% less then buying it at the store!

Ok, lets get to how to actually make the yogurt. It takes about 12 hours but only about 10 mins of your time. I start it when I get home for work. By the time I go to bed it is ready to incubate. I let it incubate overnights and in the morning I have yogurt!


What You Need
Yields 2 quarts regular yogurt or 1 quart Greek yogurt

1/2 gallon or 8 cups of Milk (I use fat free or 1% but you can use whatever you like)
1/2 cup of Natural Plain Yogurt with Live and Active Cultures (this can be regular or Greek yogurt)
Crock-pot
Towel
Thermometer that reads down to 120° and up to 180°

Additional for Greek Yogurt
Coffee Filters or Cheesecloth
Strainer
Mixing Bowl


What To Do

Step 1: Put the milk in the crock-pot. If your crock-pot has a thermometer, connect the thermometer, set it on low and set the temperature to 180°. If you don't have a crock-pot with a thermometer just set your crock-pot on low and set a timer for 3.5 hours.


Step 2: After about 3-3.5 hrs the milk should reach 180°. If your crock-pot doesn't have a thermometer open the crock-pot and check the temperature. If it is not at 180° close the lid and let it sit for a bit longer and check again. The milk needs to get to 180° to denature the protein. When the milk reaches 180° crack the lid open and let it cool to 120°. This should take about 1-1.5 hours. Check frequently, you don't want it to get below 120°.

Step 3: Once the temperature gets to 120° remove the skim off the top of the milk. Then remove 1 cup of hot milk, stir in the 1/2 cup yogurt and mix together. Pour the mixture back into the crock-pot, give it a good stir and put the top back on.


Step 4: Wrap the crock-pot in a beach or bath towel. Place the crock-pot in the oven (turned off) for about 8-10 hours. *You don't have to put it in the oven but it gives it an extra insulation to help regulate the temperature. The goal here to maintain the temperature as long as possible so the cultures can incubate.


Step 5: Open after 8-10 hours and you have yogurt! It will be a bit runny and may have whey floating on top. Place it in the fridge to chill and firm up. Enjoy or go to Step 6 to learn how to make Greek yogurt. *The yogurt is good for about 10 days in the fridge. Don't forget to save 1/2 a cup to use as a starter for the next batch!


 Step 6: To make Greek yogurt place the strainer on top of the bowl, place 1-2 coffee filters over the strainer covering the holes of the strainer, then fill with yogurt. Let it sit in the fridge for at least 2 hours. The longer you let it strain the  thicker and creamier it will get. Once you have your desired thickness remove the yogurt from the strainer, place in a sealed container and enjoy!


Up-cycled Old Chairs

This is an easy weekend project. You can use a chair you already have or buy a used one.  I got these chairs off of Craigslist for $5 a piece. 


What You Need:

Sandpaper
Primer Spray Paint (I used 2 cans)
Spray Paint (I used about 4 cans)
Something to Cover the Ground
Fabric (enough to cover the seat of the chair + 30%)
Staple Gun
Staples

What To Do:

Step 1: Remove the seat of the chair. Sand your chair. If it has a clear coat on top make sure you remove it. Don't forget to get under the chair and in the nooks and crannies.


Step 2: Cover the ground you are going to be spray painting on. Prime your chair. **Make sure you read the instructions for the spray paint and follow them carefully! This is very important!**


Step 3: While the primer is drying, reupholster your seat. You do not need to remove the old fabric. One of my chairs had several layers of old fabric so I removed a couple of the layers. The other chair only had one layer so I left it. Cut about 30% more fabric then you need to cover your chair. Having more fabric is better then less. Start stapling on one side. Staple every 1-1.5 inches. Make sure you pull the fabric tight as you go. Fold the corners over so the fabric isn't sticking out on the ends.

Before

After


Step 4: Once the primer dries, start painting with the color of your choice. Again, read the instructions for the spray paint. You will probably need 3-4 coats depending on what color you are using.

Step 5: Once the paint has dried, reattach the seats. Now you an old chair that looks like new!


Tuesday, August 13, 2013

Tomato and Basil Pasta

I came across this recipe a long time ago and thought I'd try it again last night. It takes about 45 minutes to make. Most of the time is spent waiting for the water to boil and the tomatoes to cook.


What You Need
Makes 2 servings

2 cups Cherry or Grape Tomatoes (or 1 basket)
2 servings of Bow Tie Pasta (or the pasta of your choice)
1/2 cup Fresh Basil Leaves
2 tbsp Extra Virgin Olive Oil
1 tbsp Balsamic Vinegar
2 tsp Italian Seasoning


What To Do

Step 1: Boil a pot of water. Add the pasta. Once cooked, drain the pasta.

Step 2: Preheat the over to 375°. Cut the tomatoes in half. Place the tomato halves in glass bakeware or a baking sheet with a lip. Add the olive oil, balsamic vinegar and Italian seasoning. Give the bakeware/baking sheet a good couple of shakes to thoroughly coat the tomatoes. Place in the oven for about 20 minutes or until the tomatoes start to wrinkle and soften.


 Step 3: Once the tomatoes are done, let them sit for a few minutes. Gently mash the tomatoes. You don't want to mash them to bits, you just want to get some of the juice out. Be careful at this step! The tomatoes can squirt and the liquid is hot!

Step 4: Add the tomato mixture and all the liquid in the dish to the pasta. Chop up the basil and add into the pasta as well. Mix well. Serve topped with Parmesan cheese. Enjoy!


Bruschetta

I made these 3 different bruschetta tonight to go with dinner. They all have the same ingredients but different tastes and textures. They were all quick and easy to make.


What You Need

1 Baguette
Olive Oil
Crushed Garlic
1 Tomato
Basil Leaves
Parmesan Cheese

What To Do

For all 3 bruschettas: Preheat the oven to 425°. Cut up the bread into 1/2 inches thick pieces. Spread crushed garlic over each piece of bread, then lightly dip each piece of bread into olive oil on a plate (or brush it on). Continue to the bruschetta of your choice.

Bruschetta 1:

Slice up a tomato, then cut each slice in half. Place 1 slice of tomato on each piece of bread. Top with a little bit of Parmesan cheese. Bake in the oven for about 10-15 minutes or until the bread is browned. Top each piece of bruschetta with 1 basil leaf. Enjoy! *This bruschetta has a strong, fresh basil flavor.


Bruschetta 2:

Slice up a tomato, then cut each slice in half. Place 1 basil leaf on each piece of bread. Then place a slice of tomato on on top of the basil leaf. Top with a little bit of Parmesan cheese. Bake in the oven for about 10-15 minutes or until the bread is browned. Enjoy! *This bruschetta has a more mild basil flavor.


Bruschetta 3:

Bake in the oven for about 10-15 minutes or until the bread is browned. While the bread is cooking cut 1 tomato into chunks, chop up 6 basil leaves and mix together. Once the bread is cooked top with the tomato and basil mixture.  Enjoy! *This bruschetta has a much fresher taste.


**Bonus Bruschetta**

Cut up a baguette into 1/2 inch slices. Bake at 425° for about 10-15 minutes or until bread is browned. Top with blue cheese crumbled and drizzle honey over the top. Enjoy!!!


Monday, August 12, 2013

Vermicelli Noodle Bowl

This is a quick and healthy dinner! The list of ingredients is a little overwhelming but you can always substitute, replace or even add ingredients. If I don't have lettuce on hand I will replace it with cabbage or sometimes I add other vegetables I have lying around.

I get my Vermicelli noodles at the local Asian market. They are much cheaper and they have a much better selection then the big name grocery store. I like to buy ones that are already portioned into servings. They are much easier to deal with then vermicelli noodles that come in a big chunk.


What You Need
Makes 2 servings

2 servings of Vermicelli Noodles
2 dozen Small Shrimp
1 1/2 Small Lettuce Heads
2 handfuls of Bean Sprouts
1/2 cup Shredded Carrots
1/4 cup Cilantro
1/4 cup Mint
1 dozen Basil Leaves
2 tbsp Lightly Salted or None Salted Peanuts
1 tsp Extra Virgin Olive Oil
The Green of 2 Green Onions

For The Sauce
1/3 cup Sugar
1/3 cup Hot Water
1/3 cup Fish Sauce
1 tsp Crushed Garlic
1 tsp Dried Red Pepper Flakes


What You Need To Do

Step 1: Start boiling a pot of water for the Vermicelli noodles. Heat up olive oil in a pan on Medium. When the olive oil is warm add the shrimp. Stir the shrimp occasional until they are fully cooked. 

Step 2: Once the water is boiling add the Vermicelli noodles. After 1-2 minutes drain the noodles and set them aside.

Step 3: Wash all the vegetables. Cut up the lettuce, mint, cilantro and green onion. Chop up the peanuts into small pieces.


Step 4: Heat up the water in the microwave, in a microwave safe container, for 1 minute. Add the sugar to the hot water. Stir until the sugar dissolves completely. If the sugar doesn't dissolve put the water and sugar mixture back into the microwave for 45 seconds. Once dissolved, stir in the fish sauce, crushed garlic and dried red pepper flakes. 


Step 5: Assemble all ingredients. Start with the noodles on the bottom, then add the veggies and shrimp, top it off with the green onion and chopped peanuts. Pour 1/2 the sauce on top of each serving. Enjoy!


Tuesday, August 6, 2013

Chicken, Spinach and Sun Dried Tomato Pasta in a Mascarpone Cream Sauce

This is a delicious and fairly quick recipe. It took me about 30 minutes to make. You can substitute the spinach for basil and/or the chicken for shrimp.


What You Will Need
Makes 2 servings

3 Chicken Tenderloins
1 tbsp Crushed Garlic (or 1 clove of garlic)
1 tbsp Olive Oil
1/4 cup Sun Dried Tomato
3 cups Spinach
1 1/2 cup Dried Pasta of Your Choice

For the Sauce:
4 oz Mascarpone
1 tbsp Butter or Margarine
1/2 cup Grated Parmesan
Dash of Nutmeg


What To Do

Step 1: Boil a pot of water. Once the water is boiling add the dry pasta.

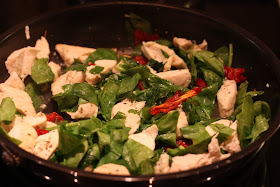
Step 2: Heat up the olive oil and garlic in a pan on Medium heat. Once it is hot (about 1 minute) add the chicken. While the chicken cooks wash and chop the spinach. When the chicken is cooked remove it  from the pan, cut into pieces and place back in the pan on Medium-Low heat. Add the spinach and sun dried tomatoes. Cook until the spinach is wilted. 


Step 3: Heat the butter/margarine on Medium-Low heat until it is melted and starting to bubble. Add the mascarpone. Stir until the mascarpone has melted. Take the pan off the heat and add the grated Parmesan, stirring frequently. Once the Parmesan has melted stir in a dash of nutmeg.

Step 4: Drain the pasta. Mix the pasta, mascarpone cream sauce and chicken mixture. Enjoy!


Monday, August 5, 2013

Spinach and Artichoke Grilled Cheese

This is a quick and tasty dinner. It only took me about 15 minutes to make.

I never measure when I cook but this is about the amount of each ingredient I used. Feel free to use more or less of an ingredient or use a different cheese. Whatever suits your tastes. 

What You Will Need
Makes 2 sandwiches

3 cups Fresh Spinach 
2 tsp Crushed Garlic (or substitute with 1 clove of garlic)
3 tbsp Artichoke Anitpaste (or substitute with 3 artichoke hearts)
1/2 cup Mozzarella Cheese 
4 Slices of Bread
1 tsp Olive Oil


What To Do

Step 1: Wash and chop the spinach. If you are using garlic cloves and/or artichoke hearts chop them as well.

Step 2: Heat the olive oil and garlic in a pan on Medium-Low to Medium heat. Add the chopped spinach. Once the spinach has started to wilt add the artichoke.


Step 3*: Lay 2 slices of bread in a pan. Add 1/4 of the cheese to each slice of bread. Then add half the artichoke/spinach mixture to each. Add the rest of the cheese. Grill on Medium heat until the cheese has melted and the bread is golden brown.

Step 4: Enjoy!!!

*Optional addition: Prosciutto! I added it at the last minute. The sandwich is great without it but if you need/want meat I suggest prosciutto. 

Pool Noodles

This is an easy and inexpensive way to keep your boots from falling over!  Just cut them to the size you need for your boots and Wa-lah!


I got these at the Dollar Store last week. 

Saturday, August 3, 2013

Welcome!!!

Welcome to my blog! I'll be posting crafts, cooking, baking and organization instructions and tips. I hope you enjoy!